Inspired by a talk on Software Defined Radio (SDR) during a TinkerSoc night, and motivated by the rocketing number of hits the society’s website after their blog post about SDR was featured on Hack-A-Day. I decided to try it out for myself!
SDR works due to the RTL2832 chipset which has a very wide frequency receiver range. This chipset is used in a lot of the USB TV tuners out there, however not all of them. A list has been compiled on the Osmocom.org website where they also have a huge amount of information about SDR.
Having brought myself a USB TV Tuner off Amazon for £14 and free shipping it is clear that this is a really inexpensive way to get into amateur radio.

The USB Tuner arrived at my house at university on the day of the fifth Raspberry Pi Jam, it seemed like an ideal opportunity to combine the two interests.
Having learnt a little bit about the different programs available during the talk at TinkerSoc, I decided to use rt-_tcp a lightweight piece of software that has the RTL (Realtek) drivers.
RTL-tcp is a sub program of RTL-sdr which is a command line interface program for controlling the TV tuner. By using RTL-tcp you are setting up a server which you can then connect to and stream the data from the Raspberry Pi to your computer. The benefit of this is that your antenna can be high up outside in the cold, meanwhile you are inside, nice and cosy.
Arriving at the Raspberry Jam I immediately set myself up with a my RPi connected to all the peripherals like the monitor and keyboard, as well as connecting it to my laptop over an Ethernet cable and I bridged the LAN to my wireless connection in order to install the software.
I was fortunate that two gents were very kind as to start helping me, teaching me my way around the command line and explaining the function of programs like aptitude and git.
Referencing a guide on hamradioscience.com I started to set up my RPi with all the software I needed.
To start with I checked that all dependencies were installed. There are programs that RTL-SDR and -TCP will need in order to work correctly. To check and/or install these dependencies I had to use the sudo apt-get install function and then install git, cmake, libusb-1.0-0.dev and build-essential.
sudo apt-get install git
sudo apt-get install cmake
sudo apt-get install libusb-1.0-0.dev
sudo apt-get install build-essential
The next step was to download RTL-sdr and install the drivers.
git clone git://git.osmocom.org/rtl-sdr.git
cd rtl-sdr/
mkdir build
cd build
cmake ../
make
sudo make install
sudo ldconfig
The final step is to copy the rules file (rtl-sdr.rules) which can be found at /home/pi/rtl-sdr and this file should be copied into etc/udev/rules.d .

Once the rules are in place you need to plug in the TV tuner and then you are ready to test that everything is working correctly by using the command rtl_test -t.

If everything is working all right, as it is in the picture above, then it is time to start the server and then set up your listening station.
To start the server type rtl_tcp -a followed by the ip address of your Pi. The ip address can be found by typing ifconfig into the command line, the ip address is the set of 4 numbers in the eth0 section. next to the lable “inet addr”.
SDR Sharp is a program written in C# that claims to be high performance with design in mind. It is also the program I decided to use with rtl-tcp.
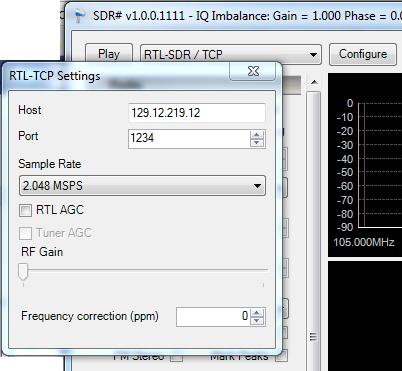
To set SDR Sharp up with the raspberry pi, RTL-SDR / TCP must be selected from the drop down list, and then click configure.

The Raspberry Pi’s ip address should be entered into the host cell, and in the Port cell is the default value that doesn’t need to be changed. Volume can be adjusted using the RF Gain slider if you want a more permanent higher volume.
 When you have finished configuring, just press play. If all has gone well, then you will see the waterfall of data start to fall down the screen and hopefully hear something. In all likely hood you won’t hear anything straight away, so you will want to change the frequency, you can do this by clicking on the top or bottom of the numbers representing the frequency at the top pf the screen, or by clicking along the activity bar.
Happy listening.
————– UPDATE ————–
April 2014
So after not using SDR for over a year I have set up my Pi to listen to the airwaves again. This was sparked by a comment below asking for help.
I followed my own walk-through and encountered the same issues as Ryan had encountered.
I managed to resolve these by adding “blacklist dvb_usb_rtl28xxu” to the file
/etc/modprobe.d/raspi-blacklist.conf by entering
sudo nano /etc/modprobe.d/raspi-blacklist.conf
and entering the extra line at the bottom.
After rebooting everything worked well.


